Azure Bastion 3 – Securing Access to Virtual Networks
- Next, we are going to configure a network rule on the firewall to allow outbound access to 8.8.8.8 on the port 53 UDP, which is for DNS resolution:
$NetRule1 = New-AzFirewallNetworkRule -Name “Allow-DNS” -Protocol UDP -SourceAddress 10.0.2.0/24 `
-DestinationAddress 8.8.8.8 -DestinationPort 53
$NetRuleCollection = New-AzFirewallNetworkRuleCollection
-Name RCNet01 -Priority 200 `
-Rule $NetRule1 -ActionType “Allow”
$Azfw.NetworkRuleCollections.Add($NetRuleCollection)
Set-AzFirewall -AzureFirewall $Azfw
In this section of code, we have created an Azure Firewall application rule to allow outbound access to Google’s DNS server, which is 8.8.8.8 for DNS resolution, as shown in the following screenshot:

Figure 15.22 – Adding a firewall rule to allow outbound DNS traffic to 8.8.8.8
- Finally, we are going to change the DNS server address for VM01 to 8.8.8.8 to align with the firewall rule for DNS:
$NIC01.DnsSettings.DnsServers.Add(“8.8.8.8”)
$NIC01 | Set-AzNetworkInterface
Now that we have completed all the required configurations, let’s test and confirm the VM and firewall rules:
- Navigate to the Azure portal by opening a web browser and visiting https:// portal.azure.com.
- Navigate to the new VM we created called VM01. On the Overview page, select Connect and choose Bastion:

Figure 15.23 – Connect to the VM using Bastion
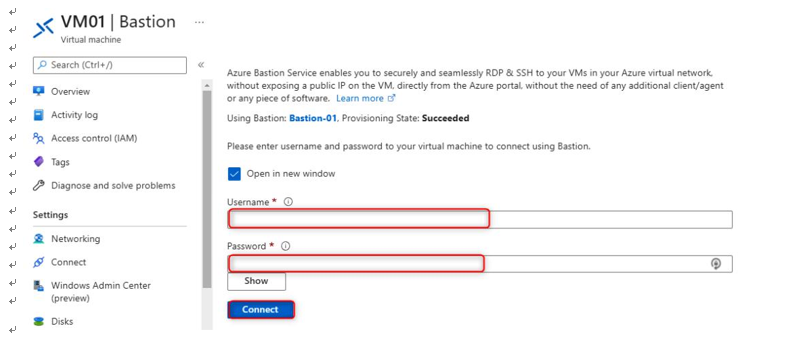
- Next, the Bastion window is will appear, and you will need to enter the VM credentials you specified in step 7 and then click on Connect:

Figure 15.24 – Enter the credentials for the VM on the Bastion blade
- On the VM, open up PowerShell and enter the following commands:
nslookup www.google.com
nslookup www.microsoft.com
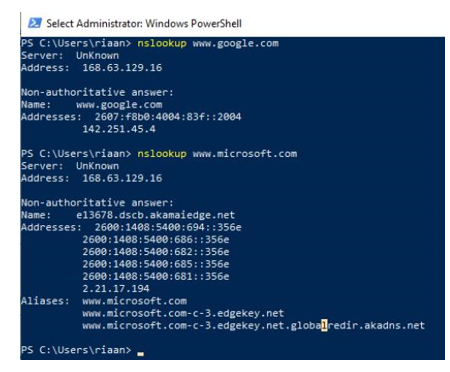
Both commands should return answers, as the DNS queries are allowed through the firewall:

Figure 15.25 – Proof that the firewall DNS settings are working as expected
- Next, we want to confirm that we are able to browse only to www.google.com and not any other sites. To do this, run the following command in PowerShell:
Invoke-WebRequest -Uri https://www.google.com
The preceding command will request the www.google.com website via the PowerShell command-line interface (CLI):

Figure 15.26 – The firewall allowing traffic to www.google.com
- Finally, let’s confirm that we are not able to visit any other FQDN, such as www. microsoft.com. In order to test this, run the following command in PowerShell:
Invoke-WebRequest -Uri https://www.microsoft.com
The screenshot confirms that we cannot resolve www.microsoft.com based on the Azure Firewall configuration rules, which is the expected behavior:

Figure 15.27 – Traffic is not allowed to www.microsoft.com as per our firewall configuration
To summarize this demo section, we have learned how to configure Azure Bastion along with an Azure firewall to allow DNS requests to 8.8.8.8 and only allow www.google. com from a browsing perspective and block all other sites.
We encourage you to further read up on Azure Bastion and Azure Firewall by using the following links:
• https://docs.microsoft.com/en-us/azure/firewall/ overview#:~:text=Azure%20Firewall%20is%20a%20 cloud,availability%20and%20unrestricted%20cloud%20 scalability.
• https://docs.microsoft.com/en-us/azure/firewall/threat-intel
• https://docs.microsoft.com/en-us/azure/firewall/policy-rule-sets
• https://docs.microsoft.com/en-us/azure/bastion/ bastion-overview#:~:text=Azure%20Bastion%20 is%20a%20service,browser%20and%20the%20Azure%20 portal.&text=Using%20Azure%20Bastion%20protects%20your,-secure%20access%20using%20RDP%2FSSH.
If you want to remove the resources created in this section to avoid further costs, you can run the following command in PowerShell:
Connect-AzAccount
Remove-AzResourceGroup -Name Test-FW-RG
The preceding PowerShell commands will remove the RG we created earlier along with all resources within it to ensure there will be no unforeseen costs incurred by the resources for this chapter.
This will help you save additional costs.
Summary
In this chapter, we discussed what NSGs are and how to use them to create new rules, as well as how to associate them with a subnet. We also discussed how to evaluate NSG rules based on priority. Lastly, we covered Azure Firewall and Azure Bastion, what they do, and how to configure them via a hands-on demo.
After reading this chapter, you should now know how to secure VNets via an NSG and secure resources by using Azure Bastion and Azure Firewall. In the next chapter, we’ll cover how to configure load balancing by using Azure Application Gateway and internal and external load balancers, and how to troubleshoot load balancing.