Testing the load balancer – Configuring Load Balancing
Testing the load balancer
To test the load balancer, we need to obtain its public IP address and paste this into a browser window. Wait for the VMs to be fully provisioned and running. You can check this in the Azure portal:
- To obtain the public IP address, run the following code in the Azure CLI:
#Obtain public IP address
az network public-ip show --resource-group AZ104-PublicLoadBalancer –name PacktPublicIP --query [ipAddress]
–output tsv
- Paste the output of this line of code into your browser window, which can be on any computer, to see Azure Load Balancer in action:

Figure 16.16 – Testing the public load balancer
You have just successfully connected to your web application through the public load balancer. You should now feel confident working with public load balancers and understand the distinction between public load balancers and ILBs. Next, we will explore some basic troubleshooting you can perform on a load balancer.
Troubleshooting load balancing
At times, you may have problems with your deployed load balancing service, and you will be required to troubleshoot in order to ascertain the root cause of the issue and identify how to rectify the issues.
For this exercise, we will work with the resources you deployed in the previous chapter.
Since these no longer exist, please redeploy in the same way, then do the following:
- Navigate to your load balancer on the Azure portal. Under Settings, click Health probes.
- Click on your health probe and change the port to 800 from 80. Click Save.
- Navigate back to your test VM and connect to the IP address of your load balancer. Notice that you get an error message when connecting:
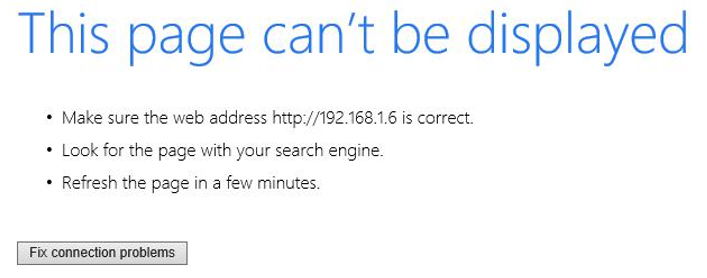
Figure 16.17 – Connection error
- Change the probe port back to 80 and notice you now receive a success message:
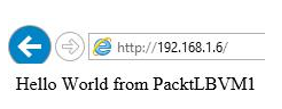
Figure 16.18 – Connection success
- Navigate to both your backend VMs and click Networking under Settings. Click Add inbound port rule.
- Configure as follows and click Add:
•Source: Any
• Source port ranges: *
•Destination: Any
•Service: Custom
•Destination port ranges: *
•Protocol: Any
•Action: Deny
•Priority: 1010
•Name: Port_80_Block
- Attempt to connect to your load balancer again and notice you again receive an error message.
You have now seen some common problems around load balancing connection configuration that could occur, and you know where to look for that going forward. You should now feel comfortable troubleshooting load balancers. In the next section, we will explore an application gateway.